Pro Tools In 15 minutes - Lesson 4
Welcome to this quick tutorial designed for you to learn how to record using Pro Tools in 15 minutes. This tutorial has 6 videos less than 3 minutes long (without counting introduction). My goal is that after around 15 minutes you will be have the sufficient knowledge to start a session in Pro Tools, setup levels, and start recording.
In this video you will learn how to route signal into a audio track and sound check that signal to get an optimal recordable level. By the end of the video, you should confidently know how to record an audio signal into Pro Tools.

The Playback Engine in Pro Tools is the heart of its Inputs and Outputs (I/O), as this is how the software connects to other external I/Os. This is why Pro Tools will not launch without a valid audio interface, as it will require the hardware I/O.


If you are singing through a microphone and you hear a delay.The time in between is called Latency.
A good rule to remember when it comes to buffer size is low for tracking, high for mixing. You want a lower buffer size when tracking to ensure minimal delay. But when you’re mixing, you want to raise the buffer size so the computer can process a wider scope of tasks (such as processing a lot of plug-ins). That is why you must ask yourself the question; What am I using ProTools for?.
To access your track's I/O settings

Select the input you desire to record.
The purpose of soundcheck is to make sure that there is an optimal level of signal for our recording. To start soundcheck you must enable the "Track Record Enable" button so signal can pass through the track. Strum a few chords or sing a few lines and make sure to watch the meter.

When something clips, it produces a distorted sound that is very difficult to fix almost impossible. The only time clipping is allowed is for artistic purposes.
The sweet spot in the meter is when the signal is just touching the lighter shade of green. There is not an industry standard rule, but that is a good
start.
Once you have an optimal level you are ready to start tracking!
Good Luck and have fun making awesome music.
I hope you enjoy this tutorial,
Angel De Luna.
Lesson 4 - Set and Record.
In this video you will learn how to route signal into a audio track and sound check that signal to get an optimal recordable level. By the end of the video, you should confidently know how to record an audio signal into Pro Tools.
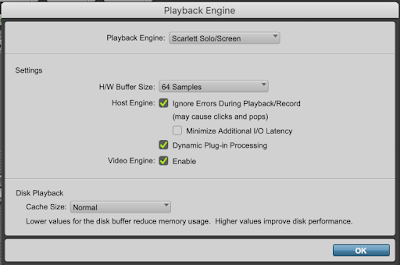
Playback Engine
Access the Playback Engine Window click Setup ---> Playback Engine.

The Playback Engine in Pro Tools is the heart of its Inputs and Outputs (I/O), as this is how the software connects to other external I/Os. This is why Pro Tools will not launch without a valid audio interface, as it will require the hardware I/O.

Buffer Size
Buffer size is the amount of time it takes for your computer to process any incoming audio signal. A lower buffer size will create less audible delay but will make your computer work harder. A higher buffer size will create more audible delay but will free up resources for your computer to use on other processing tasks.
If you are singing through a microphone and you hear a delay.The time in between is called Latency.
A good rule to remember when it comes to buffer size is low for tracking, high for mixing. You want a lower buffer size when tracking to ensure minimal delay. But when you’re mixing, you want to raise the buffer size so the computer can process a wider scope of tasks (such as processing a lot of plug-ins). That is why you must ask yourself the question; What am I using ProTools for?.
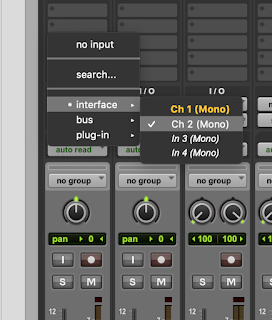
Track Setup.
To access your track's I/O settings


Select the input you desire to record.
Soundcheck and Metering.
The purpose of soundcheck is to make sure that there is an optimal level of signal for our recording. To start soundcheck you must enable the "Track Record Enable" button so signal can pass through the track. Strum a few chords or sing a few lines and make sure to watch the meter.

Metering
When soundchecking, we want to avoid Clipping. Clipping is when a signal exceeds the maximum dynamic range supported by an audio device. In this case, Pro Tools engine is our device, and we do not want to clip its engine.When something clips, it produces a distorted sound that is very difficult to fix almost impossible. The only time clipping is allowed is for artistic purposes.
The sweet spot in the meter is when the signal is just touching the lighter shade of green. There is not an industry standard rule, but that is a good
start.
Once you have an optimal level you are ready to start tracking!
DOWNLOAD MY PRO TOOLS SESSION AND AUDIO FILES HERE.
Good Luck and have fun making awesome music.
Angel De Luna.


Comments
Post a Comment